Change detection has always been a hot topic, and it’s no wonder – it’s one of the core concepts of any framework. Regardless of how it is designed and implemented, change detection remains one of the framework’s most essential tasks and, at the same time, one of the main reasons developers choose to work with them.
In Angular, this topic is especially controversial, mainly due to the “magical” nature of the change detection mechanisms backed by Zone.js. Recently, this area has undergone significant updates, particularly with the introduction of signals and the ability to opt out of using Zone.js. Let’s explore how these changes have unfolded.
A (not so) quick recap
Before diving into the changes introduced, it’s crucial to have at least a basic understanding of the change detection mechanism that has been in place for years. This foundation will help us better grasp the new concepts as they build upon the existing ones rather than introducing something entirely new or independent (evolution, not revolution). If you feel comfortable with change detection before the introduction of signals and Zoneless execution, you may consider skipping this chapter.
When discussing change detection, I find it helpful to split it into two aspects of its execution: „when” and „how„. Understanding both elements is essential for comprehending Angular’s overall change detection process.
When?
As you might expect, the “when” part is related to change detection scheduling. It covers when change detection occurs and the factors that lead to its execution.
In addition to the option of manually triggering change detection, it is primarily the scheduler’s job to handle this for us. Since the early days of Angular, the change detection scheduler has been based on the Zone.js library. This library tracks various tasks by patching browser APIs and intercepting task executions.
Simplifying a bit, we can say that Angular’s zone (NgZone) checks if the microtask queue is empty after each intercepted operation finishes. If it is, it emits a special event, which is then consumed by the scheduler, ultimately resulting in a change detection run. We won’t delve into more details here. Still, if you are unfamiliar with this mechanism, I highly recommend reading this article (or even all related articles if you’re genuinely interested).
The critical takeaway is to understand that Zone.js provides Angular with hints about completed operations, prompting the framework to react by running change detection. Importantly, this duo does not know at this point whether any data bound to the template has actually changed, meaning that a refresh may or may not be necessary.
How?
The “how” part focuses on the mechanics of change detection execution, including the traversal of the component tree and the process of checking for changes. Once a change detection run is scheduled, it’s essential to understand what this means for our app, how it will be carried out, and the outcomes.
Below is a concise recap of the change detection basics we will need for further discussions. You may also consider reading this overview, which briefly explains the topic.
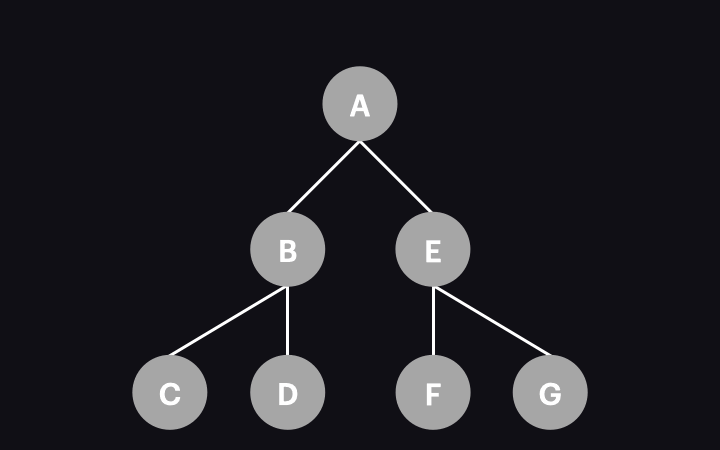
Angular’s component structure forms a tree. In the default configuration, the following rules describe how the process is executed at a high level:
- The process starts from the root component(s).
- The entire component tree is checked for changes, meaning every node is visited.
- The direction of traversal is top to bottom.
- The exact order of visiting the nodes follows a depth-first search (DFS) algorithm.
The animation below illustrates the process:
So, what happens when a single node is visited/change detected? This involves several operations, including executing lifecycle hooks, updating bindings, and refreshing the view if necessary. We won’t dive into these details here, as they cover a broader topic. For this article, it’s enough to remember that if any data changes occur, the component view will be updated during the change detection process.
It’s also essential to address a common misconception: Angular components aren’t “rerendered” during change detection. This implies that the entire component template DOM is replaced, which isn’t true. Angular is smart enough to update only the DOM nodes (or even just individual attributes) that actually need to change.
Change detection strategies – OnPush
In Angular, there are two change detection strategies: Default and OnPush. The rules described in the “How?” chapter effectively outline the Default strategy. So, what about OnPush? How does it differ?
The basic rules for traversing the component tree remain the same, but OnPush allows us to “cut off” or skip some branches during change detection. This leads to fewer operations being executed, resulting in better performance.
When a component uses OnPush, it (and its children) won’t always be checked during change detection. Instead, they will only be checked when marked as “dirty.” The whole branch is skipped if the component isn’t marked as dirty.
It’s possible to mix Default and OnPush components in the app; for example, if a parent component is OnPush and a child component is Default, the child will still be checked for changes as long as it is reached (meaning the parent was dirty and not cut off).
At this point, we can also revisit the rule that “the entire component tree is checked for changes, meaning every node is visited.” This is no longer true if we use OnPush components, which forms our exception.
You can see an illustration of the process below:

Dirty marking
In the previous section, we mentioned that the OnPush strategy relies on component dirtiness for the change detection process. A natural question arises: what can make a component dirty? There is a closed set of operations that put a component into this state:
- An input value changes (immutable).
- A template-bound event occurs (including output emit and host listener).
- A value is consumed by an async pipe.
- A direct call to
ChangeDetectorRef.markForCheck(). - A state change of a
@deferblock.
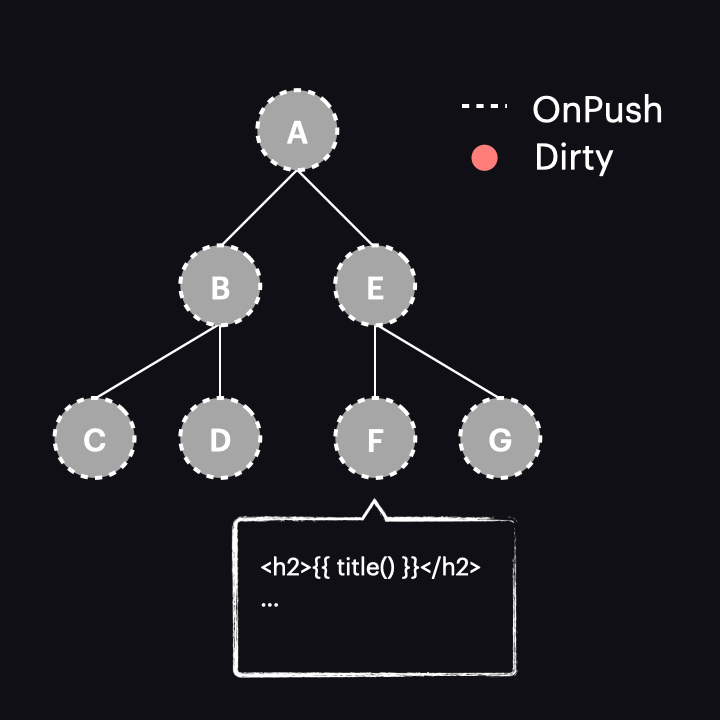
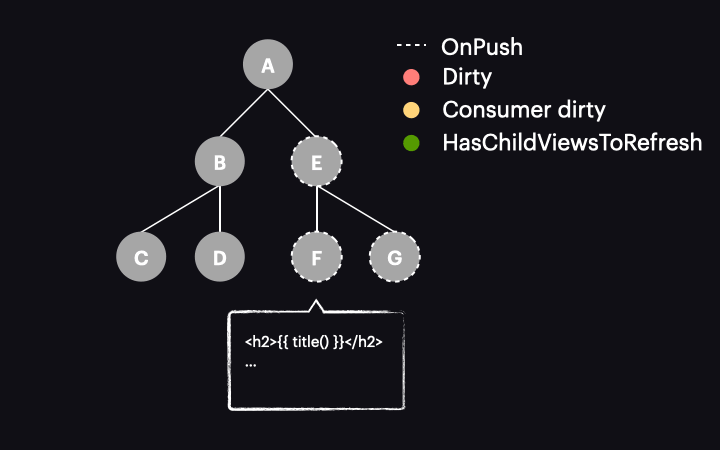
Another important point is that these operations “bubble up” through the component hierarchy. It’s the responsibility of the markViewDirty function. This means that not only is the component where the change originates marked as dirty (F in the example above) but all of its parent components up to the root are also marked (E and A in our case). This ensures that a nested component (F) will always be reached by change detection and not cut off by any OnPush and non-dirty parent (like E).
Otherwise, if only F were marked as dirty hypothetically, a future change detection run starting from A would stop at E (since it’s OnPush and not dirty) and never reach F. This highlights why marking all parent components is essential.
The only exception to the “bubbling up” rule occurs when a component is marked as dirty due to an input value change from a parent component’s binding. In this case, the parent component is already in the middle of its own change detection check, so there’s no need to mark it as dirty again. Instead, only the component receiving the input is marked, allowing change detection to process it after the parent finishes.
Improving “how” – signals
Now that we’ve refreshed our knowledge of Angular’s tried-and-true change detection rules, we can explore how the process can be improved.
Recently, signals have been the driving force behind many of the framework’s most exciting improvements, and change detection is no exception. When it comes to improving the „how” aspect, signals offer a significant enhancement over the standard process. Let’s take a closer look at how this works and what developers need to do on their end.
This article assumes you already have a basic understanding of signals, signal graphs, and related concepts. If not, I highly recommend first checking out Max Koretskyi’s in-depth article: Signals in Angular – Deep Dive for Busy Developers.
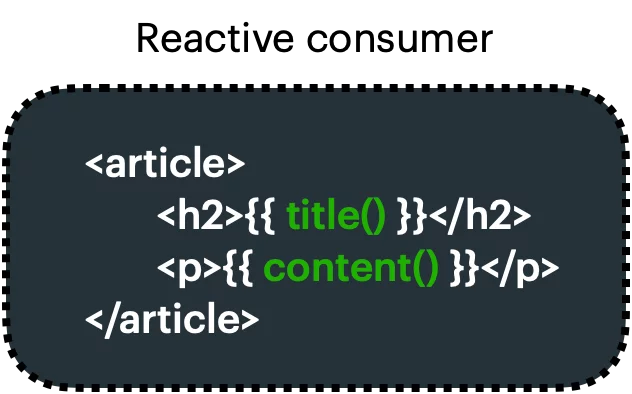
The first key concept to grasp is that, from the perspective of the signals graph, the component view acts as a reactive consumer, meaning it reacts to signal reads within the template. We can visualize this as follows:
When a signal read in the template gets a new value, it marks the reactive consumer as dirty. It’s important to emphasize this distinction – the reactive consumer attached to the component view is marked as dirty, not the component view itself (i.e., not the node in the component tree). Otherwise, it would be the same process as the regular OnPush strategy. With this distinction, we get a different result, which you’ll see in a moment.
But what does marking the reactive consumer as dirty mean for our application? Well, this depends on which version of Angular you’re using. Before v17, marking the reactive consumer as dirty would also mark the component view as dirty, resulting in behavior similar to the AsyncPipe.
The best we can achieve in this case is to use it with OnPush for all components, thereby narrowing change detection to just a single path:
However, as we just discovered, it works exactly like the AsyncPipe, so there doesn’t seem to be much benefit here.
Things change drastically with Angular 17 or newer. In these versions, marking the reactive consumer as dirty no longer marks the entire component as dirty. Instead, a new function called markAncestorsForTraversal is triggered. This function travels from the component up through its ancestors to the root component (as markViewDirty did), but instead of marking them as dirty, it leaves the current component as is (since the reactive consumer is already marked as dirty). Its ancestors, however, receive a new HasChildViewsToRefresh flag. It looks like this:
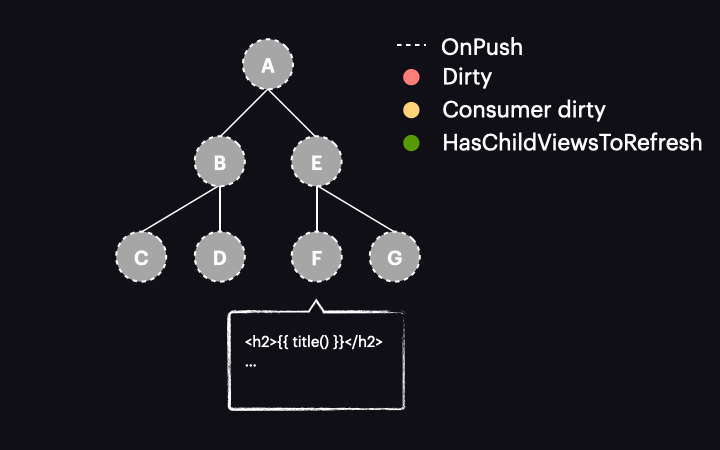
The change detection traversal mechanism has also been updated. Now, when the process starts with the tree in this state, it passes through components A and E without performing change detection on them. This is because they are OnPush but not dirty. Thanks to the new HasChildViewsToRefresh flag, Angular continues visiting nodes marked with this flag and searching for the component requiring change detection (in our example it’s the one with a reactive consumer marked as dirty). When it reaches component F, it finds that its reactive consumer is dirty, so this component gets change detected – and it’s the only one!

Pretty cool, right? We’ve gone from change detecting the entire path of components to just one component. While this is a simplified example of a component tree, the performance gains in real applications are much more substantial.
This new approach to change detection, where only one component is change detected thanks to signals, is often called “semi-local” or “global-local/glocal” change detection.
Caveats
However, there are some caveats to consider. Let’s examine this example, where a user click triggers a signal change:

After the button is clicked, we notice that instead of the scenario described earlier, our component and all of its ancestors are marked as dirty, resulting in all of them being change detected. Why does this happen? It’s because the old change detection rules are still in effect. Do you remember the triggers for marking a component as dirty? One of them is template-bound events, and that’s precisely what’s occurring here. If you debug such an example, you will see that while markAncestorsForTraversal is called, so is markViewDirty.
This leads us to the conclusion that the source of the signal value change matters. If it originates from something that marks the component as dirty, there is no advantage over the standard OnPush strategy used, for example, with the async pipe. To benefit from semi-local change detection, the trigger needs to come from an action that does not mark the component as dirty but still schedules change detection for us. Examples include:
setInterval,setTimeoutObservable.subscribe,toSignal(Observable), e.g.,HttpClientcall- RxJS
fromEvent,Renderer2.listen
Another caveat, which is more obvious but still can hinder our efforts, is the lack of an OnPush strategy for some of the components in the app. Given the tree below and assuming the trigger for the signal value change does not mark components as dirty, the ABCD subtree will still undergo change detection alongside our F component simply because those components do not use OnPush and will be checked for changes during every run (the default strategy still applies to them).
Improving “when” – Zoneless
We’ve just explored how signals have significantly improved the “how” of Angular’s change detection process. Now, let’s dive into the complementary side: how can the “when” part be improved? It turns out the Angular team’s answer is to “go Zoneless”.
Why remove Zone.js?
First of all, let’s consider why we would want to get rid of Zone.js at all. There are a couple of reasons:
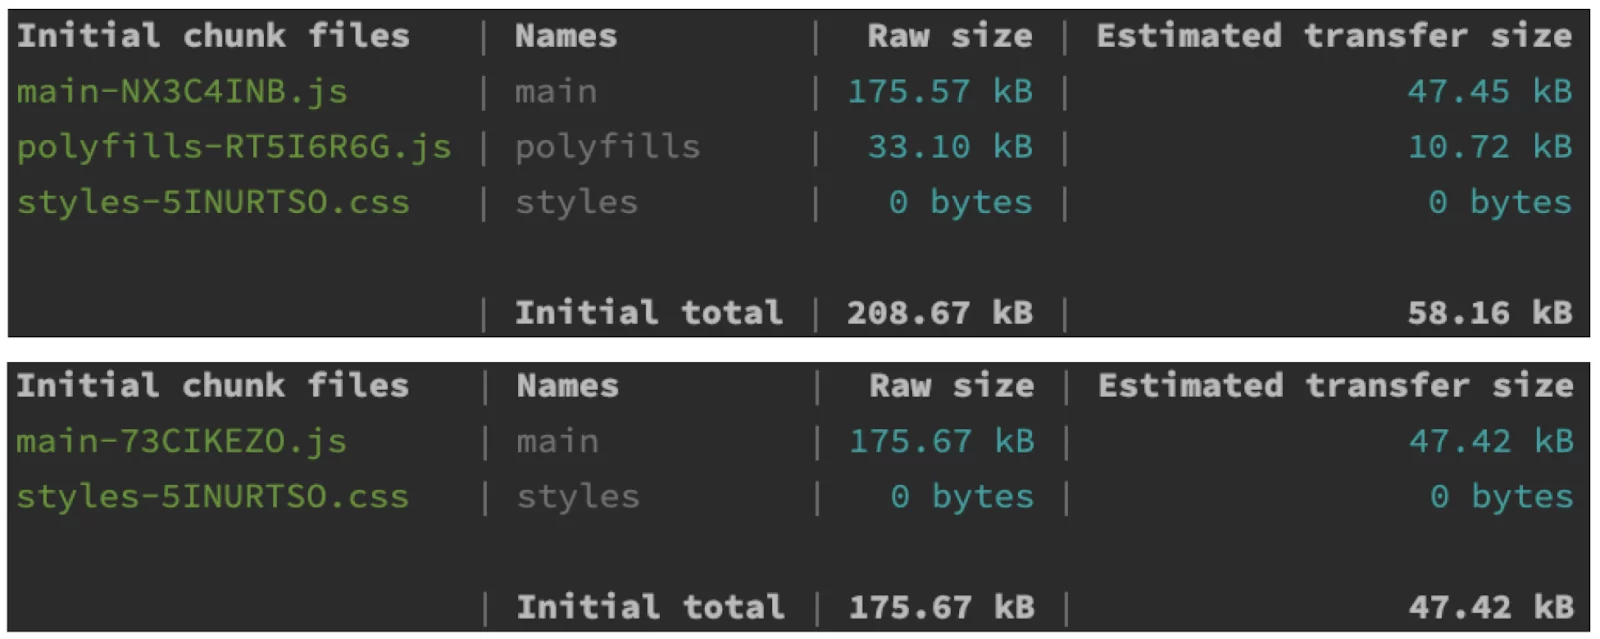
- Reducing initial bundle size: Please look at these two outputs (Zone-full and Zoneless). As you can see, Zone.js is about 30kB raw and around 10kB gzipped. That’s quite a lot for a dependency that has to be eagerly loaded before our application starts bootstrapping.
- Avoiding unnecessary change detection cycles: Zone.js assists Angular’s change detection by notifying it when operations finish, but it doesn’t actually know whether these operations change any data. Because of this, the framework tends to overreact by scheduling a run “just in case.”
- Improving debugging: I bet many of us have encountered lengthy call stacks while developing applications (the screenshot below shows just about 20% of the stack – and it’s only for a click handler!).
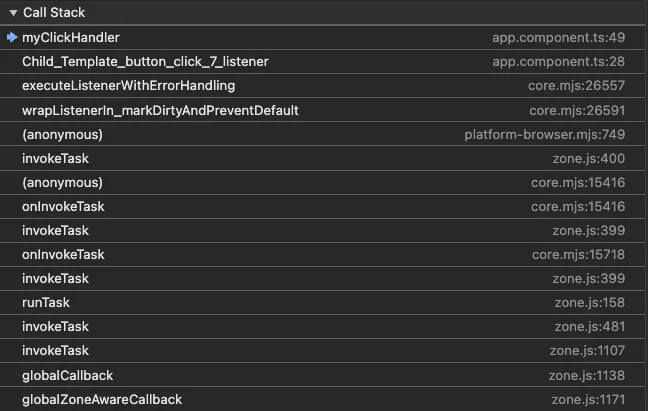
The Zone.js, framework and application code mix is not very readable and easy to work with when debugging. Even though the Angular team improved the debugging experience a lot in version 15, it’s still nice to be able to eliminate the Zone.js part completely.
- Speeding up the bootstrap process: Besides having to be loaded before the framework starts, Zone.js must also be executed to patch and intercept various browser APIs. Getting rid of this can also save us some precious time.
Please don’t get me wrong – I believe Zone.js is a fascinating tool (or at least it was at the time of its introduction) that significantly contributed to Angular’s success from the beginning. It makes working with the framework easy, even for inexperienced developers – they can simply focus on their tasks, and then the magic happens.
However, as we’ve seen, this magic comes with a cost. I’m pretty sure that many, if not most, applications run perfectly fine with Zone.js. That said, seeking alternatives is a logical step when dealing with more complex solutions that require improved performance.
So, what is the alternative to Zone.js in Angular? Well, since we already know it’s the scheduler’s job to trigger change detection, it’s no surprise that we got a new one.
Zoneless scheduler
The new Zoneless scheduler, introduced in version 17.1, moves away from relying on Zone.js events and waits for explicit notifications of changes from other parts of the framework. This shift is significant. Rather than triggering change detection “when some operation just happened, and something might have changed”, the framework now triggers it “when it receives a notification that the data has changed”.
To facilitate this, the new scheduler exposes a special notify method, which is called in the following scenarios:
- When a signal read in the template receives a new value (specifically, when
markAncestorsForTraversalis called). - When a component is marked as dirty via the
markViewDirtyfunction. This can occur due to a new value received by anAsyncPipe, a template-bound event, a call toComponentRef.setInput, or an explicit call toChangeDetectorRef.markForCheck, among others. - When an
afterRenderhook is registered, a view is reattached to the change detection tree or removed from the DOM. In these cases,notifyis called, but it only executes hooks without refreshing the view.
You might wonder if change detection could run too frequently, such as when several signals change values or events occur quickly. Fortunately, the scheduler’s implementation is designed to handle this efficiently. It collects notifications over a short period and schedules a single change detection run instead of triggering it multiple times. This behavior is based on a race condition between setTimeout and requestAnimationFrame, but we won’t dive into those details here. The key takeaway is that these notify calls are coalesced, ensuring optimal performance.
To enable the new scheduler, you need to update your app as follows (the key addition is provideExperimentalZonelessChangeDetection, the rest depends on your existing setup):
import {ApplicationConfig, provideExperimentalZonelessChangeDetection} from '@angular/core';
import {bootstrapApplication} from "@angular/platform-browser";
import {AppComponent} from "./app.component";

export const appConfig: ApplicationConfig = {
 providers: [
   provideExperimentalZonelessChangeDetection(),
 ]
};

bootstrapApplication(AppComponent, appConfig)
 .catch((err) => console.error(err));

// remove the following from angular.json:
//
// "polyfills": [
//   "zone.js"
// ],
The animation below illustrates how the new Zoneless scheduler operates within an application that utilizes OnPush and signals:

Of course, this represents the best-case scenario, where a signal value change marks only a single component for change detection and triggers the change detection run. This means we’re running change detection only where it’s necessary and exactly when it’s needed.
An important insight is that you don’t have to use signals to switch to a Zoneless approach. The new scheduler can respond to various types of notifications beyond signals (as mentioned earlier), allowing OnPush-rich applications to benefit from this capability as well.
Even better, you don’t have to fully transition to the Zoneless approach all at once. You can still achieve improved performance while using the zone-based scheduler.
Zonefull/hybrid scheduler
In the previous chapter, we noted that the Zoneless scheduler was first introduced in version 17.1. Angular 18 not only significantly improved this implementation but also introduced an exciting enhancement to the existing zone-based scheduler by incorporating the explicit notification mechanism we’ve already seen in the Zoneless scheduler. This means that the scheduler now listens not only for Zone.js events but is also triggered by the notify method.
Before Angular 18, if a signal value changed outside of the zone, change detection would not be scheduled – only operations performed within the zone would guarantee that change detection would be scheduled. For example, consider the following code, which would not result in a view refresh:
zone.runOutsideAngular(() => {
  httpClient.get<Post>('https://jsonplaceholder.typicode.com/posts/1')
    .pipe(
      delay(3000),
      map((res) => res.title)
    ).subscribe((title) => {
      this.title.set(title);
    });
});
With the enriched hybrid scheduler, we can still achieve a view refresh in the same scenario. This is because the change in the signal value invokes the notify method, and it no longer matters whether we are inside or outside of the zone.
This opens up numerous new possibilities for applications that are not yet Zoneless-ready but can still benefit from the gradual transition.
Summary
I hope this article helped you understand the advancements in Angular’s change detection mechanisms and how these concepts can work together. I would also be happy if one of your main conclusions is that you don’t have to go “all in” with these changes. If that’s stopping you from utilizing these latest features, please remember you can steadily adapt signals over time, make successive components OnPush compatible, and eventually switch to a Zoneless approach. In the meantime, you’ll still reap the benefits.