The deferrable views (a.k.a @defer block) is a new Angular feature where we can declaratively lazy load a part of our HTML. In other words, we can select which part of our component tree should be in a different chunk and lazy load on a specific action. If you want to read more about the deferrable views, you should definitely read this one.
Before we dive into coding how to test the deferrable views, let's take a step back and understand how deferrable views can load content in general.
There are different ways to load a view and some of them require a user interaction, while others do not.
In the table below, you can see more details:
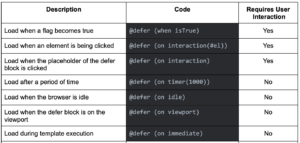
Q1: Why is it important to know if it requires a user interaction?
A1: Well, if it requires a user interaction it is fairly straightforward how to write our unit test. We simply have to mimic that action and then assert.
Q2: How about the cases where we do not have a user interaction?
A2: One could say that we can mock the underlying implementation. After all, this is what we normally do while unit testing, right? However, it would be hard to mock the requestIdleCallback (the underlying implementation of the idle) and the IntersectionObserver (the underlying implementation of the viewport)
Q3: Is there a way to avoid mocking the requestIdleCallback and IntersectionObserver?
A3: Angular provides a test harness where we can explicitly load which part of the deferrable view needs to be rendered.
The Test Harness
With the term “Test Harness” we mean the testing API that helps test the components. It provides a way to interact and verify the behavior of the components in the testing environment. If you want to learn more about this, I encourage you to check this YouTube video from my colleague Mateusz Stefańczyk "Testing with component harnesses" – Mateusz Stefańczyk | #8 Angular Meetup
Speaking of the deferrable views, there are two behaviors to test them:
- Manual
With this option we can select which defer block we need to be loaded and which state. - Playthrough
This is the default behavior and our unit test behaves like the code is being rendered in the browser.
We define the behavior in the configureTestingModule like so:
TestBed.configureTestingModule({
deferBlockBehavior: DeferBlockBehavior.Manual,
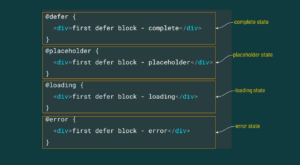
});Other than the behavior, we also have the option to select which state to render. The available states are depicted in the following enum file:
export declare enum ɵDeferBlockState {
    /** The placeholder block content is rendered */
    Placeholder = 0,
    /** The loading block content is rendered */
    Loading = 1,
    /** The main content block content is rendered */
    Complete = 2,
    /** The error block content is rendered */
    Error = 3
}
While Playthrough seems straightforward, we might need to understand the Manual a bit more.
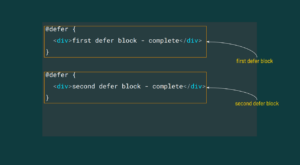
With the Manual, we select which defer block to work with, and we also select the state we want to render. Let’s say, in the example below, that we need to render the second defer block
The required code would be:
// Get the second defer block fixture
const deferBlock = (await fixture.getDeferBlocks())[1]; //note the index number

// Render the complete state
await deferBlock.render(DeferBlockState.Complete);
Let’s now see what the states are:
If we need to render the loading state, the code will become:
// Get the second defer block fixture
const deferBlock = (await fixture.getDeferBlocks())[1]; //note the index number

// Render the loading state
await deferBlock.render(ɵDeferBlockState.Loading);
Since we now have a better understanding of the defer block testing tools, let’s get started and see how to unit test each individual trigger.
Testing Trigger Points
For each unit test, we will load this component:
Lazy Component:
@Component({
  selector: 'app-lazy',
  standalone: true,
  template: ` <p>lazy works!</p> `,
})
export class LazyComponent {}
When (Playthrough)
Because users need to do something to trigger the "when" feature, we'll use the Playthrough option. This is actually the default setting, so it’s ok not to define it in the configureTestingModule!
Let’s assume the component we need to test is the following:
Dummy Component for testing:
@Component({
    selector: 'app-root',
    template: `
      <button data-test="button--isVisible"
              (click)="isVisible = !isVisible">
        Toggle
      </button>

      @defer (when isVisible) {
        <app-lazy />
      }
      ,
    `,
    standalone: true,
    imports: [LazyComponent],
  })
  class DummyComponent {
    isVisible = false;
  }
To load the <app-lazy/>, we should first click the button, and then assert.
The unit test will be:
it('should render the defer block on button click, fakeAsync(() => {
    // Arrange
    TestBed.configureTestingModule({
      deferBlockBehavior: DeferBlockBehavior.Playthrough,
    });

    fixture = TestBed.createComponent(DummyComponent);

    const button = fixture.debugElement.query(
      By.css('[data-test="button--isVisible"]'),
    );

    // Act
    button.triggerEventHandler('click', null);
    fixture.detectChanges();
    tick();

    // Assert
    expect(fixture.nativeElement.innerHTML).toContain('lazy works!');
  }));
on interaction – explicit (Playthrough)
Since the “on interaction” requires user interaction, we will use the Playthrough behavior.
> With the “explicit interaction” I mean that, to load the deferrable view, we need to explicitly interact with an element.
Let’s assume the template we need to test is the following:
<button #toggleButton data-test="button--isVisible">Toggle</button>

@defer (on interaction(toggleButton)) {
    <app-lazy />
}
To load the <app-lazy/>, we should first click the button, and then assert.
The unit test will be:
it('should render the defer block on explicit interaction', fakeAsync(() => {
    // Arrange
    TestBed.configureTestingModule({
      deferBlockBehavior: DeferBlockBehavior.Playthrough,
    });

    fixture = TestBed.createComponent(DummyComponent);

    const button = fixture.debugElement.query(
      By.css('[data-test="button--isVisible"]'),
    );

    // Act
    button.nativeElement.click();
    fixture.detectChanges();
    tick();

    // Assert
    expect(fixture.nativeElement.innerHTML).toContain('lazy works!');
  }));
Note: In this unit test we are not using the triggerEventHandler method here since the native element does not have an event handler on the click event
on interaction – implicit (Playthrough)
Since the “on interaction” requires a user interaction, we will use the Playthrough behavior.
> With the “implicit interaction” I mean that, to load the deferrable view, we need to interact with the deferrable view.
Let’s assume the template we need to test is the following:
@defer (on interaction) {
    <app-lazy />
} @placeholder {
    <div data-test="el--placeholder">
        click here to load the complete state
    </div>
}
To load the <app-lazy/>, we should first interact (click) the placeholder, and then assert.
The unit test will be:
it('should render the defer block on implicit interaction', fakeAsync(() => {
    // Arrange
    TestBed.configureTestingModule({
      deferBlockBehavior: DeferBlockBehavior.Playthrough,
    });

    fixture = TestBed.createComponent(DummyComponent);

    const placeholderElement = fixture.debugElement.query(
      By.css('[data-test="el--placeholder"]'),
    );

    // Act
    placeholderElement.nativeElement.click();
    fixture.detectChanges();
    tick();

    // Assert
    expect(fixture.nativeElement.innerHTML).toContain('lazy works!');
  }));
on timer (Playthrough)
The “on timer” doesn’t require user interaction, but since the underlying implementation is the setTimeout, we will use the Playthrough behavior.
Let’s assume the template we need to test is the following:
@defer (on timer(1000)) {
  <app-lazy />
}
The unit test will be:
 it('should render the defer block on timer', fakeAsync(() => {
    // Arrange
    TestBed.configureTestingModule({
      deferBlockBehavior: DeferBlockBehavior.Playthrough,
    });

    fixture = TestBed.createComponent(DummyComponent);

    // Act
    fixture.detectChanges();
    tick(1000);

    // Assert
    expect(fixture.nativeElement.innerHTML).toContain('lazy works!');
  }));
Note that in this unit test we wait (tick(1000)) for the same time as we have in timer(1000)
default (Manual)
By default, things happen when the system isn't busy (on idle). So, using @defer is the same as saying @defer (on idle). This "on idle" stuff relies on requestIdleCallback which can be tricky to test on its own. That's why we use the Manual behavior for testing. Later, we'll learn how to render each different state.
Let’s assume the template we need to test is the following:
@defer {
  <app-lazy />
} @placeholder {
  <div>Placeholder text</div>
} @loading {
  <div>Loading text</div>
} @error {
  <div>Error text</div>
}
Load the placeholder state and unit test that:
  it('should render the defer block on idle - placeholder', async () => {
    // Arrange
    TestBed.configureTestingModule({
      deferBlockBehavior: DeferBlockBehavior.Manual,
    });

    fixture = TestBed.createComponent(DummyComponent);

    // Assert
    expect(fixture.nativeElement.innerHTML).toContain('Placeholder text');
  });
Note: in the case of the placeholder there is no need to specify the rendered state since the placeholder is being rendered by default.
Load the loading state and unit test that:
it('should render the defer block on idle - loading', async () => {
    // Arrange
    TestBed.configureTestingModule({
      deferBlockBehavior: DeferBlockBehavior.Manual,
    });

    fixture = TestBed.createComponent(DummyComponent);

    // Act
    const firstDeferBlock = (await fixture.getDeferBlocks())[0];
    await firstDeferBlock.render(ɵDeferBlockState.Loading);

    // Assert
    expect(fixture.nativeElement.innerHTML).toContain('Loading text');
  });
Load the error state and unit test that:
it('should render the defer block on idle - error', async () => {
    // Arrange
    TestBed.configureTestingModule({
      deferBlockBehavior: DeferBlockBehavior.Manual,
    });

    fixture = TestBed.createComponent(DummyComponent);

    // Act
    const firstDeferBlock = (await fixture.getDeferBlocks())[0];
    await firstDeferBlock.render(ɵDeferBlockState.Error);

    // Assert
    expect(fixture.nativeElement.innerHTML).toContain('Error text');
  });
Load the complete state and unit test that:
  it('should render the defer block on idle - complete', async () => {
    // Arrange
    TestBed.configureTestingModule({
      deferBlockBehavior: DeferBlockBehavior.Manual,
    });

    fixture = TestBed.createComponent(DummyComponent);

    // Act
    const firstDeferBlock = (await fixture.getDeferBlocks())[0];
    await firstDeferBlock.render(ɵDeferBlockState.Complete);

    // Assert
    expect(fixture.nativeElement.innerHTML).toContain('lazy works!');
  });
on viewport (Manual)
> same with idle
The underlying implementation of the “on viewport” is the intersectionObserver API, which is hard to mock. That’s why we use the Manual behavior.
Let’s assume the template we need to test is the following:
@defer (on viewport) {
  <app-lazy />
} @placeholder {
  <div>on viewport the complete state will be loaded</div>
}
The unit test will be:
  it('should render the defer block on viewport', async () => {
    // Arrange
    TestBed.configureTestingModule({
      deferBlockBehavior: DeferBlockBehavior.Manual,
    });

    fixture = TestBed.createComponent(DummyComponent);

    // Act
    const firstDeferBlock = (await fixture.getDeferBlocks())[0];
    await firstDeferBlock.render(ɵDeferBlockState.Complete);

    // Assert
    expect(fixture.nativeElement.innerHTML).toContain('lazy works!');
  });
on immediate (Manual)
> same with viewport
Let’s assume the template we need to test is the following:
@defer (on immediate) {
  <app-lazy />
}
The unit test will be:
 it('should render the defer block on immediate', async () => {
    // Arrange
    TestBed.configureTestingModule({
      deferBlockBehavior: DeferBlockBehavior.Manual,
    });

    fixture = TestBed.createComponent(DummyComponent);

    // Act
    const firstDeferBlock = (await fixture.getDeferBlocks())[0];
    await firstDeferBlock.render(ɵDeferBlockState.Complete);

    // Assert
    expect(fixture.nativeElement.innerHTML).toContain('lazy works!');
  });
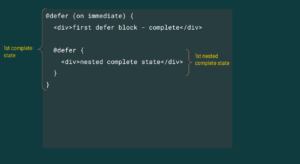
on immediate with nested blocks
Let's break down testing these nested blocks step-by-step. Imagine the nested block lives inside another block, like a box within a box.
To test the inner box, we first need to build the outer box. Then, we can build the inner box itself.
In the picture, the "nested defer block" is tucked inside a bigger block. So, to test it, we need to build the whole big block first, and then build the little nested block inside.
Let’s assume the template we need to test is the following:
@defer (on immediate) {
  <app-lazy />

  @defer {
    <div>nested complete state</div>
  }
}
The unit test will be:
it('should render the nested defer block', async () => {
    // Arrange
    TestBed.configureTestingModule({
      deferBlockBehavior: DeferBlockBehavior.Manual,
    });

    fixture = TestBed.createComponent(DummyComponent);

    // Act
    const firstDeferBlock = (await fixture.getDeferBlocks())[0];
    await firstDeferBlock.render(ɵDeferBlockState.Complete);

    const secondDeferBLock = (await firstDeferBlock.getDeferBlocks())[0];
    await secondDeferBLock.render(ɵDeferBlockState.Complete);

    // Assert
    expect(fixture.nativeElement.innerHTML).toContain('nested complete state');
  });
Let’s break down the code a bit. We first render the outer defer block (firstDeferBlock), and then we are accessing all the inner defer blocks (firstDeferBlock.getDeferBlocks).
Conclusion
The way we test defer blocks in Angular is pretty good, thanks to a testing tool created by the Angular team. But there's a small catch. Right now, you need to tell the test exactly which defer block to check, by providing an index number. This can be a problem if you add more defer blocks later because your test might accidentally break.
The good news is that the Angular team is aware of this, and future updates will give us more ways to write defer block tests.
Thanks for reading my article! 🙂